Some Tips for import products from China

Some Tips for importing from China

First I want to introduce myself  as a exporter also a distributor in Hongkong, China. We are in the line of beauty care products. Here I want to share my experience of trading.

OK, let’s begin.

Why import from China?

Almost anything that you can imagine is made in this country. Because of lower wages and overall costs, prices for wholesale imports from China are almost unbeatable. It’s logical to import products that fit your market strategy from China. With some patience and due diligence, you can locate reliable suppliers in China.

Who to deal with?

Start importing goods from China by finding the best distributor; dealing directly with a factory is incredibly difficult even for Chinese speakers. A broker or agent will call around for the best possible price. Based upon the size of the order, brokers and manufacturer’s agents can get a decent discount on the price.

How to check the quality?

The most directly and fastest way to check the quality is asking for some samples. Express delivery services (e.g., UPS, DHL and FedEx) have major distribution hubs across China, with guaranteed 24 hour next-day delivery between major cities in China and America. They are much expensive to pay for them in China, so I advice you to have an account to collect the delivery cost on your side.  It’s safe, easy and fast. Most of supplier would send some free samples but not willing to pay for the Express Delivery.

How to delivery the goods?

In my experience, as to small quantity products (weight between 10KGS to 200KGS ) also you want the products get to you in a week, the economic air shipping is the best way to choose. Especially the gross weight between 30KGS to 200KGS, it’s much cheaper to send my Hongkong which means you don’t need to pay hundreds of money for customs. We all know that Hongkong is a free-trade area.  That’s what we do for our clients to save money and time.

As to big amount of products, you’d better have your products send by sea.

  • Deal directly with a reputable agent. Shipping through Chinese customs requires a skilled professional shipping agent. The agent must be licensed with the Chinese government in order to ship overseas. All goods must have several official documents accompanying them through the customs clearance process.
  • Most suppliers have deal with logistics, so they can arrange for shipping as well by getting good price and good service.

Worried about the Customs Duty?

Many times I had been told by my clients that the customs duty were to high (45% or more). I am not sure whether will it helpful for you or not. Most of our clients told me to make two copies of Proforma Invoices. One is the Original Invoice, the other one was made according to their requirement (much lower price you know:)

How about the payment?

There are many ways of payment terms. While T/T and Western Union are most popular to your trustworthy supplier. If come to new supplier, it will be safe if the supplier has their company bank account. If  not, you can pay by paypal (but I found it’s not popular in China), L/C, or pay deposit first, then by the understanding while the products are read to shipping.

More information please link our catalog:http://www.box.net/shared/rednstv8fq

and write to us at: factories.alliance@gmail.com

How to use make up brush set

How to use make-up brush

Step into any makeup boutique or drug store beauty aisle and you will be overwhelmed with a barrage of makeup brushes. Which brush goes with which product? How do you use them? Here is a usage guide to a standard set of brushes.

Instructions

Foundation brush. With cream or powder foundation, a foundation brush is key. It gives better and more natural blending than a sponge, and also allows for better control. Look for one with a relatively flat, dense head about an inch wide. Rub the brush in the foundation and dot over your T-zone, then blend outwards for even coverage. “Blending” means brushing in wide circles while “pulling” the makeup out.


Blush brush. A light touch and an excellent brush is absolutely necessary with blush. The blush pictured here, called a “dome brush,” is the ideal shape. The larger the dome, the better the brush, because it makes a more natural sweep on your cheek. Dotting your brush into your blush, smile and sweep the apples of your cheeks for a natural glow.


Brow brush. This stiff, spiral and wiry brush is used to catch the hard-to-move hairs of your eyebrows. Brush upward, pluck any stray hairs below, fill in with eyebrow pencil and brush along the line of the arch.


Crease brush. The slightly flared shape of this brush makes it ideal for filling in the crease of your eye with shadow. Not used for a fine line but rather for shading, use an eyeshadow a few shades darker than the one on your lid to give your eyes excellent contrast and deeper, more powerful color.

Lid brush. These come in either flat-head or a rounded-head styles. The brush should be about 1/2 an inch wide and very flat. The flat-head brush is excellent for a very fine eyeliner brush, while the round-head can give a more blended line. Both give excellent shadow coverage for the lid.


Kohl blender: With a good eyeliner Kohl pencil, you also need a stiff, conical foam blending brush. Run it over the line and the color will blend out–and as a bonus, any stray marks will fade in.


Concealer brush. If you have a blemish or dark circles that you would prefer be covered up, apply your concealer after your foundation. It helps it set and blend better. Use a double-ended brush like the one pictured; one flat end can apply a greater amount of product, and the other, fluffier end can blend it into your makeup perfectly.

Thanks for reading, more information please link: http://www.csstorm.com

How to Use a Make Up Brush Like a Professional

How to Use a Make Up Brush Like a Professional


When applying makeup, choosing the correct makeup brush can mean a flawless finish. Makeup brushes come in different price points; it may be worth the money to invest in quality brushes that will last long, with proper care, and make applying makeup easier. Typical brushes or sponges that come with makeup do not provide the coverage brushes do. Knowing how to use the brushes correctly is the first step in countenance perfection.

Instructions

Pour a tiny bit of foundation of the tip of your foundation brush. Start with a little and add more, if needed. Starting at your nose, spread the foundation toward your cheekbones, out to the hairline and down toward your chin. Cover your entire lower face. Continue blending under your jawline.

Reload your brush with a little foundation. Start back at the bridge of your nose and spread foundation with the brush onto your forehead, up to your hairline and down over your eyelids, covering the eyelids. Continue blending with the brush until your makeup appears flawless.

Dip your powder brush into powder. Swirl into the powder and tap off extra powder on the side of the jar. Starting at your nose, follow the same path with the powder as the foundation. Blend the powder into your face.

Swirl your blush brush into the blush. Tap off the excess. Starting at the apple of your cheekbone, lightly swirl the blush brush in a circular motion. Glide the brush up toward your ear.

Put a tiny dab of concealer on the tip of your concealer brush. Lightly dab concealer under your eyes. Start at the inner corner and blend outwards. Use the tip of the brush to dab concealer on any dark blemishes or spots.

Swirl your powder brush into the powder. Tap off excess and apply powder to your entire face to set your makeup.

Dip your angled brush into water and wipe off excess moisture. Dip your brush into eyeshadow. Line your upper lid starting at the inner corner close to the lash line and working to the outer corner.

Tips & Warnings

Consider buying a blend of boar bristle brushes and synthetic materials. It keeps the cost down and works more effectively than synthetic material alone.

Always wash your brushes after use to prevent bacteria buildup. Use a mild baby shampoo or professional brush cleaner.

Thanks for reading, more information please link: http://www.csstorm.com

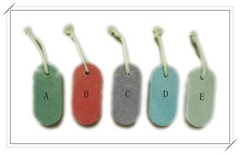
How to use pumice stone

How to Pare with a Pumice Stone–01072

Using a pumice stone is an inexpensive, quick way to give yourself a spa treatment at home. Use it to get rid of calluses on your feet and hands. It is safer to use a pumice stone on a callus than to try to pare it down with a knife. There is little risk of an infection; however, do not use pumice stone on areas of broken skin. If you are diabetic, consult with your doctor before using a pumice stone, as you are particularly at risk for infections on the feet.

Instructions

1. Take a bath or shower to moisten the skin and prepare it for the pumice stone, or soak the body part with the callus in a bowl of warm, soapy water until the skin becomes softer. This helps the pumice stone be more effective.

2. Dip the pumice stone in water to moisten it. Shake off excess water.

3. Rub your callus with the pumice stone. Do not rub hard enough to irritate or break the skin. Rub for a few minutes, and then give your skin a break. Rinse off the pumice stone when you’re finished with it.

4. Apply a generous amount of lotion to the area to help your skin soften and avoid cracks in the skin.

    5. Repeat the next day if your callus remains

How to File Pumice Stone Brush for Home Pedicures—02
A pumice stone is used to remove dead skin cells, calluses and rough spots from the bottom and sides of the feet. It’s a great tool for the home pedicure kit, and you can use it on yourself or someone else to pamper and bring softness to the feet.
Instructions

1. Hold the foot in one hand and the pumice stone in the other.

2. Rub the pumice stone on the heel of the foot, using gentle, even strokes. Start at the base of the heel and brush the stone upward to where the heel dips down. Do not rub the pumice stone on the more tender skin of the arch.

3. Increase the pressure gradually, maintaining even firmness through each stroke of the pumice stone.

4. Vary with smaller, circular movements to file around the sides of the heel and on any particularly rough spots.

5. Starting at the big toe side of the foot, use a very gentle, light stroke of the pumice across the ball of the foot, from the big toe side to the little toe side. You may need to decrease the pressure as you get to the little toe side, as feet tend to be more sensitive there and calluses usually build up more on the big toe side.

6. Increase the pressure gradually, being careful not to rub too hard.

7. Use small, circular motions to file down on the sides near the ball of the foot and on any rough spots on the toes.

8.Rinse the foot in warm water. Let the first foot soak in a warm herbal infusion while you repeat the filing on the other foot.

9. Rinse both feet, pat dry, and apply moisturizer heavily. Rub in with both hands, one foot at a time, until most of the moisturizer has been absorbed. Put on cotton socks so that you don’t slip and so that the skin will continue to absorb the moisture.

Tips & Warnings

Picasa Content

  • After using, rinse the pumice stone in cool water and let sit out until completely dry.

How to Remove Foot Callous

How to Remove Foot Callous

Callouses are a build-up of rough, thick skin. They commonly occur on the bottom of the feet. Although it’s perfectly normal to have some minor callouses on your feet, thick ones can be painful and should be removed.

Instruction:

Soak your feet in warm, soapy water for a minimum of five minutes to soften the skin on the soles.

Gently rub a pumice stone or foot file back and forth across the callous. These tools will gradually remove the tough layers of skin. If the callous is especially thick, you may have to repeat the procedure a number of times before removing most of it.

Dry off your feet and apply petroleum jelly, aloe cream or a heavy lotion containing lanolin to the calloused areas. Many department stores sell lotions specifically designed to soften tough skin on the feet.

Consider purchasing special pads, ointments or creams made to treat callouses. Prescription strength formulas are also available from your physician. Be sure to talk to your doctor about the best product for your specific condition and always follow product directions carefully.

How to Personalize a Compact Mirror with Rhinestones

  1. Wipe the surface of the compact clean to remove any dust. Plug in the glue gun.
  2. Lay the compact on work surface and go through your stash of rhinestones. Begin arranging the stones on the compact to get a pleasing result. Don’t add glue yet.
  3. Aim for a mixed but balanced look, sort of like a mosaic. For the compact in the picture, I used a mixture of oval and round rhinestones, avoiding the square-shaped ones because the corners were too sharp for such a small area.
  4. When you have arranged your rhinestones the way you want them, carefully pick them up one at a time and place a tiny dab of hot glue on the back of each rhinestone, setting it into place firmly onto the compact’s surface. Use your thumb to press down on the rhinestone for about five seconds after you apply the glue, then pull very gently to test for adhesiveness. The rhinestone should be firmly in place before you begin adding another one.
  5. Cover any spaces left in between the rhinestones with smaller jewels, using tiny dots of glue to secure them onto the bottom layer. Again, aim for a mixed effect. It’s okay to leave some space showing around the edge, but you want to have the center of the compact covered completely in “jewels.”After you’ve finished adding all the rhinestones, inspect the compact and remove any traces of dried glue, then buff gently with a paper towel and a little bit of Windex or plain vinegar to clean it up and make it sparkle.